Table of Contents
Open edX provides tools and support for creating attractive and clear course structures, including easy-to-use course authoring tools, course organization tools, and reporting tools. With these tools, instructors can quickly and easily create an effective course structure that meets the needs of their students and provides a great learning experience.
The good practices that we will see applied in the same way to any course or content, and the best thing is that it does not require you to be an expert in the construction of pedagogical content. Here you will find keys for the proper course design under simple recommendations.
1. Context and naming your Open edX courses
Let’s see an example. You can determine that a video is the best way to explain certain content. However, if the video does not include a clear title and introduction for your student, it could lead to a lack of interest and motivation in the subject.
Resist the urge! You should always provide context to the content you are presenting to your students. Please don’t assume they know what to do on a particular page or what they are about to learn. Taking the time to explain and analyze what has been seen before, concluding the topic, and adequately introducing a new topic will give your students context and make them feel supported and guided throughout their learning journey.
Another way to give context is by naming the components. For example, your students should not find titles like Video, Checkboxes, or PDF because it doesn’t provide contextualization on the theme but on the content format.
If you have already created your content and did not have this in mind, do not worry, you have time to adjust it.
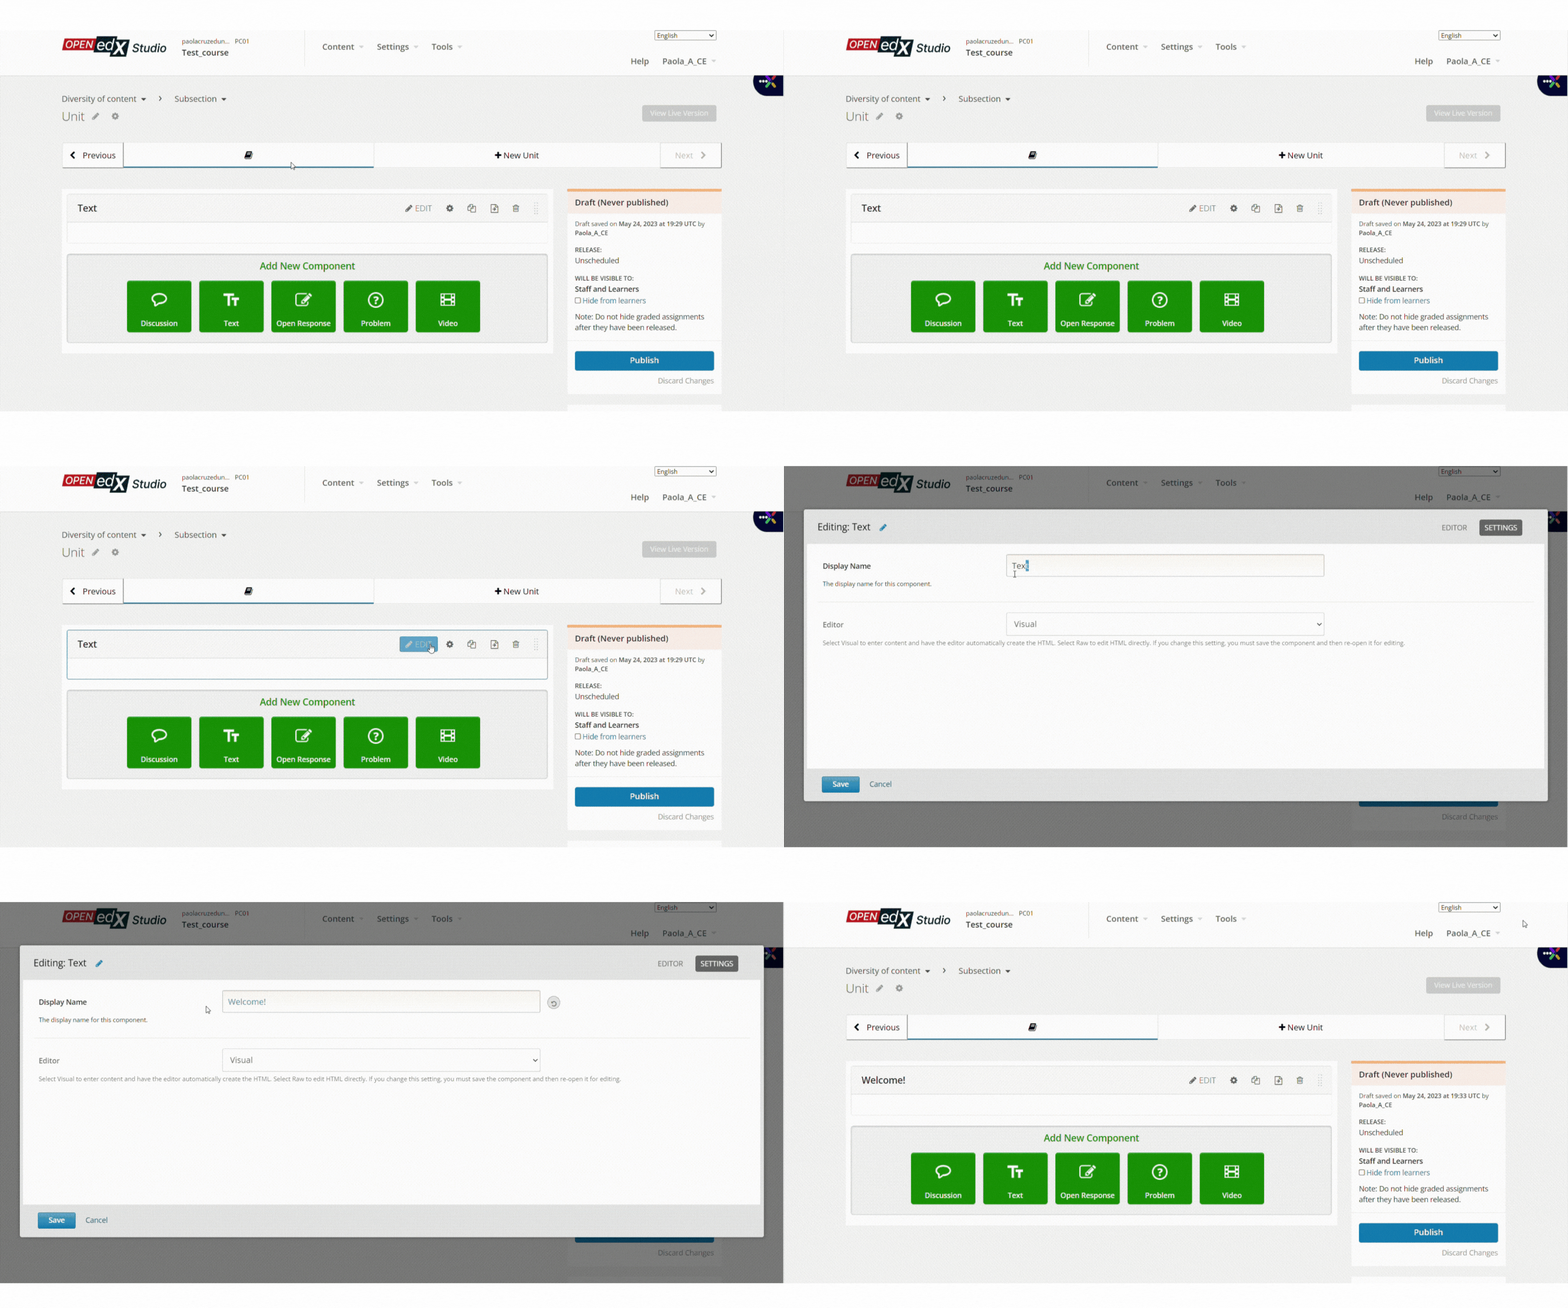
Here is a step-by-step of how to do it:
Step 1:
From Studio, enter the Unit where you will rename the component.
Step 2:
Click the Edit button on the toolbar above the component.Step 3:
The editor will open. Click on the Settings button that is in the upper right corner.
Step 4:
Modify the Display name of the component.
See the illustration below:
You can repeat this process as many times as you need. Just remember to publish the changes so your students can see them.
This will take a little time, but it will be helpful for the learning guide that the user will take within the course. It will make it easier for them to review previously seen materials and conduct content searches, allowing them to connect the themes and types of content presented.
Ensure learners know what is happening and do not assume anything
2. Open edX Platform Grading Process
A good practice when designing a course is to establish how to measure the student’s progress, and we are not referring only to generating question naires but also to establishing a grading structure. I invite you to ask yourself questions like these: What will be the minimum score or percentage to pass this course? Of all the contents that I elaborate on, how many of these will be evaluative? Within my course, how many times will I evaluate my students? Will I do a final evaluation?
You can use grading to measure your learners’ progress in a course and receive feedback on the knowledge they have acquired. It also helps motivate learners to continue to engage with the course material and push themselves to improve. Finally, it allows instructors to assess how well learners understand and apply the content.
Review the Grading options from Studio in Settings before your course is published. There you will find a tool called Assignment Types. It corresponds to categories or labels that can be created for any exercise you want to be graded. You can create as many Assignment types as you need and then associate them with each content you wish. You must assign a name, an abbreviation, and the total number. You return to the Course Outline and define the content to be graded under that Assignment you created.
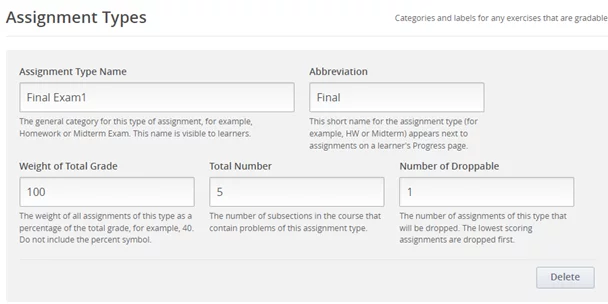
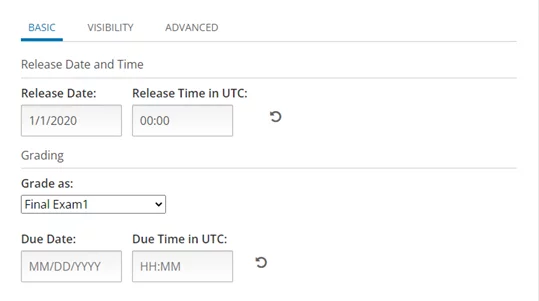
Content grade under Assignment type.
Keep in mind that all students can access their progress and know how they are doing in the course.
To conclude, not everything has to be graded. It is good to leave some content for the student to review what they have learned without feeling pressured to answer correctly or that, in each unit, they are being evaluated.
In no case is it mandatory to have a course with grading, but it is important to consider that we are applying a learning process that should give a measurable result. We must estimate the methodology or methodologies to evaluate said learning.
3. Enrollment Configuration in your Open edX instance
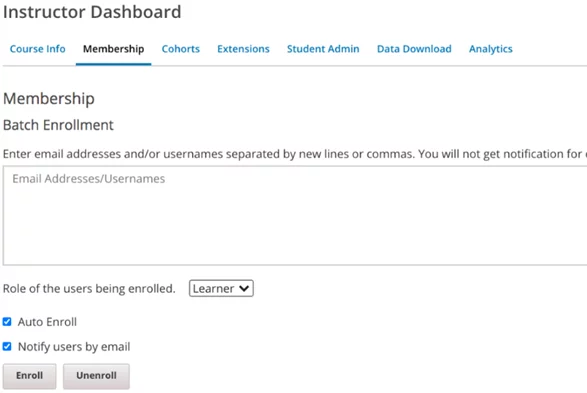
For any course created, it is advisable to review the needs of the business and, from this, establish how students will enroll in the course. Open edX offers different options in terms of user enrollment:
- Self-staff: This is the most common way for users to enroll in Open edX courses. This method requires users to log into their accounts and manually select the courses they want to join. The users can also search for specific courses and follow the instructions on the course page to enroll. This system offers less overhead for course staff, although you have limited control over access to the course.
- Staff Enrollment: This method requires the Open edX administrator to assign a user to a course. The administrator can do this by going to the course page and selecting the user from the list of available users. The user will then be enrolled in the course automatically. This is a great way to ensure all users are enrolled in the required courses. You have complete control over who is enrolled in the course. Although it implies more work for the team in charge.
An intermediate option is to leave the About it page visible and send the course link to those users you want to enroll in a certain course. For this, go to Settings > Advanced Settings, and in Invitation Only, you can activate it to True. You can also control the Course visibility in Catalog.

4. Open Response Assessment (ORA)
Open Response Assessment (ORA) is an assessment feature in Open edX that allows educators to evaluate students’ learning outcomes. You can ask learners open-ended questions and receive detailed responses from long-form, easy-style questions. This enables educators to understand better the student’s knowledge and learning goals, assess their learners’ progress in real-time, and provide a more comprehensive view of their learning.
This tool is useful for different reasons:
- Some questions require more nuanced answers.
- More nuanced answers require more subjective grading schemes.
- Students can upload files in addition to their answers.
Perhaps at this point, you think that many ways of evaluating allow you to obtain the benefits mentioned earlier. Still, in this, ORA has additional functionality that, when applied well, offers a new perspective on the common grading system where the teacher assigns the grade to his students. The panorama is extended to a peer evaluation where I can evaluate the work of my colleagues, and they can evaluate mine. But keep in mind this must be done organized, offering students clear criteria for taking the test and grading.
Let’s see how this type of tool works in detail. Several steps are followed in the evaluation process, but the best thing is that the students execute these steps.
- Your response:
The student will first see the instructions and the question and can add their answer and files if they wish. - Assess Peers
The second step is that the student qualifies their classmates. For this, the teacher must establish some criteria on which a user will evaluate the activity sent by the other. Here are some recommendations:- Quality of Work: Evaluate the quality of work peer-produced and how well they have met the task requirements.
- Originality: Assess the level of originality and creativity the peer has brought to the task.
- Attention to Detail: Evaluate how well the peer has paid attention to detail, such as accuracy, formatting, and presentation.
- Communication: Assess the peer’s ability to communicate their ideas effectively.
- Problem-Solving: Evaluate the peer’s problem-solving and critical thinking skills.
- Staff Grade
Finally, the user must wait for another one of the other colleagues to qualify him to have a cross-qualification.
ORA is an essential feature in Open edX that helps educators to better assess their students’ learning outcomes by providing more personalized feedback and gaining a better insight into their students’ understanding of the subject. To learn more about this component, visit our Knowledge Base documentation.
5. Diversity of content
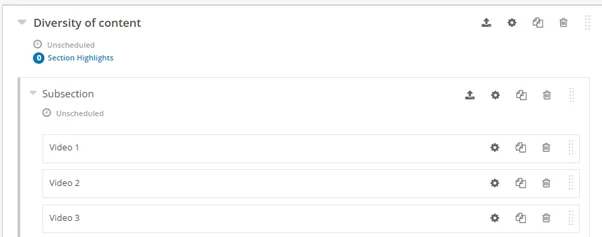
Open edX offers many different course elements that can engage students differently. These elements include videos, quizzes, discussion forums, and assignments. These elements can help to create an engaging course that encourages active participation and benefit different learning styles.
We are all always looking for diversity. Imagine eating the same thing every day, over and over again. This would lead to exhaustion, in which one wants something different. The same happens with the contents. Avoid the entire sequence of contents of your course being presented in the same format.
Also, keep in mind the learning modes. Not all of us learn in the same way, and some require more visual resources, audition, and analysis, among others, to better retain the information.
6. HTML, CSS, and external tools
Have you ever heard of these terms? Do you have experience creating this type of content?
HTML and CSS are used to create and style webpages, while external tools can add features such as video, audio, and interactive activities.
Using these types of tools allows you to present the contents harmoniously. You can perform actions such as:
- Include banners.
- Highlight the text.
- Include elements that highlight a concept.
- Include animations.
- Move the content to a different space.

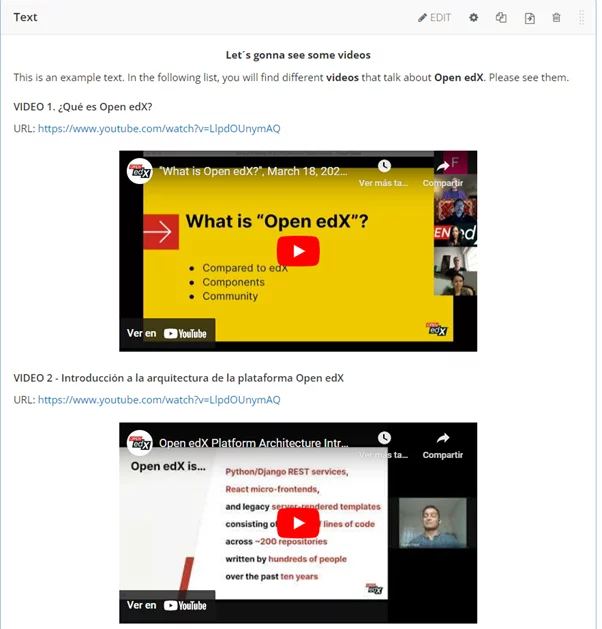
The edition possibilities that you will have are vast. It will allow you to generate emphasis and draw the student’s attention to the most relevant content. Some recommendations for using HTML and CSS are:
- Bold text emphasizes important words or phrases.
- Underline text should be used sparingly, as it is often used to indicate a link.
- Links direct readers to other web pages or documents.
- Indentation organizes the text into hierarchical sections.
- Text alignment draws attention to a specific phrase or point.
- Paragraph formatting separates ideas and improves readability.
- Fonts and font sizes must be chosen carefully to ensure readability and legibility.
- Color should be used sparingly and carefully to create emphasis and contrast.
- Lists create visual hierarchy and structure.
- Tables display data and information in a clear, organized way.
Here are some good practices to implement external tools:
- Ensure the tool is accessible for all students, including those with disabilities.
- Verify that the external tools are secure and regularly updated.
- Provide technical support to ensure students can use the tool effectively.
- Ensure the tool meets the educational goals of the course.
- Ensure that the external tools are compatible with the platform/system you are using.
- Provide clear instructions and guidelines for using external tools.
This makes it easy to create a course that looks professional and modern while also making the learning experience engaging, fun, and reflecting the individual needs of learners.
